Grayson’s Birth Story

18 days after his birth, I’m finally getting around to writing Grayson’s birth story!!

On Wednesday, May 23rd, Steve asked if I could come to the office with him to take care of some returns and warranty replacements (in case you don’t know, we own our own business and I had only been coming into the office about once a week for the past month). I was still feeling pretty good even though I was only 3 days away from my due date, so I didn’t mind going in. However, about half way through the day I started to get really moody and I just did NOT want to be there anymore. I hadn’t had too many mood swings during my pregnancy, so I joked to Steve that maybe my body was producing extra hormones to help me go into labor!

(Here I am the day I went into labor.  Took this picture in the bathroom at our office.)

We ended up leaving the office a few hours early, and Steve said that he wanted to mow the yard when we got home. Whenever he mows, I pick up the dog poop in the backyard while he mows the front. And each time I’ve done this my belly has gotten tight, so I figured, what the heck…..maybe it’ll jump start some contractions! Right before I started my wonderful task of picking up dog poop (with a pooper scooper), my mom called and asked how I was doing. She had booked her flight out here for May 31st assuming that I would be a bit late since she was 2 weeks late with me. I told her that I was 4cm dilated and 60-70% effaced at my last doctor’s appointment 2 days before and that the doctor had stripped my membranes to try and help put me into labor, but that I still wasn’t really feeling any different, but I’d let her know if she needed to change her flight.

Well, by 6pm I started to feel what I thought were just more Braxton Hicks contractions (I’d been having several per day for the past month or two, but none that were timeable). I didn’t really think anything of it until I started having some that gave me some slight lower back pain, which hadn’t happened before. I started timing my contractions around 6:30pm and they were about 30-40 seconds long, and varying from 5-10 minutes apart. From reading some information on contractions, I figured I didn’t need to call my doctor until they were at the 5-1-1 stage (5 minutes apart, 1 minute long, consistently for 1 hour), so I just kept timing them and only had a couple that were a minute or more long. By 11pm they were coming about every 2-3 minutes and lasting about 40 seconds so I decided to call my doctor. Now during this time, my contractions weren’t bad at all. They basically felt like Braxton Hicks but just with an added achey back, but completely tolerable and I could talk through them. I even made dinner and cleaned up the kitchen while timing my contractions, which is why I waited a good 5 hours to call my doctor.

When I called my doctor’s office, the on call nurse answered and I said, “Hi, my name’s Joanna McVey, and I think I might be going into labor!” I must have said it very enthusiastically because she said, “You sound very excited!” Haha! She told me that my doctor would give me a call back in the next 20 min or so (luckily my doctor was the one on call that night, YAY!). When my doctor called (she sounded very sleepy), I told her about my contractions and she said that I could go ahead and come in to the hospital. I told Steve and he went into overdrive!! He started asking me what all we needed to pack, and I told him what I had already packed and what we still needed. I got out our video camera and started filming him getting things ready, and at 11:37pm we headed to the hospital…..all the while Steve is speeding down the freeway with his hazard lights on. I told him that he doesn’t need to go that fast because my contractions didn’t even hurt that bad, and he said, “Baby, stop trying to steal my thunder! This is the only time I can legitimately speed without being afraid of getting a ticket!” Luckily there weren’t very many cars out that late, so I let him have his moment.  Oh, and I ended up calling my mom on the way to the hospital (9:50pm her time) and she was able to change her flight to arrive at 1:05pm the next day.

When we arrived at the hospital, we couldn’t figure out where we were supposed to park, so for about 10 minutes we drove around and around trying to find the parking garage that connected to the maternity ward. It ended up being the one I initially said to pull into.  We got all checked in and taken to a room where I got checked and put on a monitor. I was about 5cm dilated at this point and my contractions still weren’t bad at all. After about an hour we were moved to the labor/delivery/recovery room and I was told I could get my epidural right away if I wanted it. Since I still wasn’t really feeling much pain I declined because I actually wanted to feel what labor felt like for a little while….and so I could tell Grayson, when he got older and started acting up, all that I had gone through to bring him into the world. LOL! The nurse told us to try and sleep, but that was pretty much impossible. We were both too excited, and I couldn’t really sleep with what contractions I could feel anyway.

At 6:15am Thursday, May 24th, I got my epidural. I’m pretty sure I could have gone another several hours without one, but I knew I was going to end up getting one at some point, and I thought I might as well try to get some rest in the mean time. An anesthesiologist student gave my my epidural (with the doctor right next to her) and she nailed it on the first try, thankfully! I honestly think getting my IV hurt worse. Let me tell you, epidurals are a gift from God! I kept saying how warm my legs felt and asking Steve to touch them so he could feel how warm they were. We finally got a couple hours of sleep, and around 8am my doctor came in and broke my water and started me on pitocin (since I had only progressed to 6cm in that time). I took another nap and at 10:30am I was at 8cm. By 10:55am I was 9cm, so I called my best friend, Elizabeth, who was also going to be in the room with us when I delivered, and she headed on over. Her husband was picking my mom up from the airport, and we were hoping that they would make it in time.

Grayson’s head was a little cocked to the side so they had me lay on my left side with my right leg up in a stirrup to try to get him to move it into position. Let me tell you, trying to move the lower half of your body when you’ve had an epidural is no easy task. My legs felt SO heavy and even though I was trying super hard, using the lower half of my body to move myself was pretty much impossible. I had to use the hand rails on the bed to try to pull myself up with my arms. No easy task!  They also put me on some oxygen to keep his heart rate up.  At 11:45 I was fully dilated but his head was still cocked to the side. So I did some practice pushes with the nurse to try to get him to move down.

The next couple hours are kind of a blur, and they seemed to go by so fast. All I know is that I started pushing for real at 12:50. The nurse kept saying, “Push toward the ceiling.” And I’m like, “I don’t know what that means!!” It was so hard to feel what I was doing because of the epidural, but I tried to mimic the pushes I was doing when the nurse and doctor would say, “Great! Just like that!” I pushed for exactly one hour, and Grayson was born at exactly 1:50pm on Thursday, May 24th. Steve was such a trouper! All through my pregnancy he had said that he didn’t want to see anything that was going on and just wanted to stay by my head, and that he didn’t want to cut the cord or anything. But when the moment came, and the nurse told him to “Grab her leg!” he was all in it 100%! He saw everything. Haha! And he even cut the cord! (He told me some of the gory details later on, and I’m glad I opted not to look into a mirror as he was born). Since I couldn’t feel much I didn’t really know what was happening with each push, but I do remember pushing super hard and hearing that his head was out. And then with the next push or two the doctor (or nurse) said, “Look Mom! Open your eyes!!” and I opened my eyes just in time to see Grayson slide out into the doctor’s arms. I instantly started crying, and I was immediately in love with my new son. They put him on my chest and dried him off a little and I got to kiss his head a few times. Then they took him over to the warming table to check his vitals, do his measurements, and give him his APGAR score. He scored a 10 out of 10!!

My mom ended up getting to the maternity ward right when I pushed Grayson out, and since I had a 2nd degree tear, she had to wait until I was stitched up before she could come in. But she did get to meet her grandson within minutes of his birth, and that was really special for both of us. Grayson was given his first bath, and then we really got to see his full head of hair! He was (and is) perfect in every way!

I was also able to try breast feeding, and Grayson latched like a champ right away!!

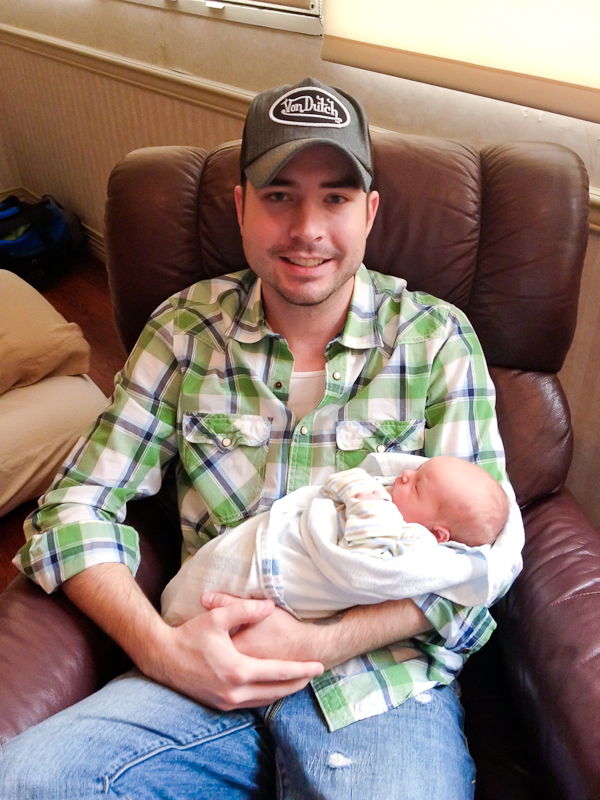
Our first family photo!

Once the epidural started to wear off, I really was in probably the most pain I’ve ever been in. I was clutching the bed rails and just couldn’t even talk. All the pain that I wasn’t feeling during birth started to rear it’s ugly head, and luckily they were able to give me some pain medication to take the edge off. The nurse had me get up about an hour after giving birth to try to pee, and let me tell you….that was an experience! At first, all I was passing was blood. It took me about 15 minutes (or more…I’m not sure how long I was in there) to even get a little out. Then I started feeling really light headed and was about to pass out, so they had to get a wheelchair to bring me back to bed. I ate a little lunch, had some water and started to feel a bit better, so they were finally able to take us to our postpartum room.

Our first night with him was pretty tiring. He was up every hour or so, and we finally decided at 5am to send him to the nursery so we could get some sleep. The next day, he slept much of the time, and I was able to do a couple laps around the maternity ward, while pushing him in his plastic crib.

That night we sent him to the nursery at midnight, and I was finally able to get 4 hours of uninterrupted sleep before they brought him back for a feeding. We were discharged on Saturday, May 26th (my due date), and thus started this brand new and exciting chapter in our lives. Parenthood.

Here are some pictures from Grayson’s newborn photo shoot (at 6 days old) taken by the talented Jenn Harvey!

Homemade Marinara Sauce

If you’re in need of a quick and easy pasta dish, canned marinara sauce is probably the way to go.  But nothing beats the taste of homemade marinara sauce, and if you have the time, I would highly suggest trying this recipe before heading to your pantry to grab that jar of the pre-made stuff.

Here’s what you’ll need:

  • 2 (14.5 oz) cans of stewed tomatoes
  • 1 (6 oz) can of tomato paste
  • 4 Tbsp chopped, fresh parsley
  • 1 – 2 cloves garlic, minced
  • 1 tsp dried oregano
  • 1 tsp salt
  • 1/4 tsp black pepper
  • Extra virgin olive oil (enough to coat the bottom of your pan)
  • Half an onion, finely diced
  • 1/2 cup of white cooking wine
  • 6 – 8 leaves of fresh basil

Add stewed tomatoes (including juice) to a food processor or blender.

Then add your tomato paste.

Finely chop or mince your garlic and add it to the tomatoes.  I think the more garlic the better!

If you’ve never cooked with fresh herbs before, this is flat leaf (a.k.a. Italian) parsley.  I think it has more flavor than the curly style parsley, but you can use either variety.

Give the parsley a rough chop and add it to the tomatoes and garlic.

Next, add the dried oregano.

And finally, season with salt and pepper.

Blend until totally combined and smooth.

Add your finely diced onion to a skillet coated in olive oil.  Cook at medium heat for about 2 minutes, or until your onions become nice and translucent.

Once your onions have been cooking for a couple minutes and are nice and soft, pour in your blended sauce.

Next add the white wine and stir to combine.  Once your sauce is bubbling, turn the heat down to low and simmer for about 20 minutes, stirring occasionally.

When your sauce has finished simmering, turn off the heat and grab a nice handful of fresh basil leaves.  Fresh basil has the most wonderful smell!

Tear leaves into small pieces and add to the sauce.  You can also chop the basil with a knife, but I like tearing it to give it a more homemade look.  Give the sauce a stir to wilt in the basil.

And there you have it!  You’ve made delicious, homemade marinara sauce!  Make it in bulk to freeze so you’ll never have to resort to the pre-packaged, processed stuff again!  Hope you enjoy!

[yumprint-recipe id=’5′]

Cookie Dough Peanut Butter Cups

I subscribe to several food blogs, so every morning my inbox is full of new posts containing tons of recipes.  Some I delete automatically, like if I see the word “mushroom” in the title, and others I just know that I want to try immediately.  The following recipe was one of those “try immediately” ones, and I was glad I had an excuse to make it for our Bible Study instead of Steve and me having to eat them all.  After I read through the blog post containing this recipe, which you can find over at How Sweet It Is, I immediately texted our small group leader to request that I be the one to make dessert this week.

These chocolate chip cookie dough peanut butter cups are SUPER rich, so make sure you have a glass of milk nearby while eating them.

Here’s what you’ll need:  (makes 24, but I doubled the recipe to make 48)

  • 2 1/2 cups milk chocolate chips
  • 1/2 cup unsalted butter
  • 1/3 cup packed brown sugar
  • 1 teaspoon vanilla extract
  • 1/4 cup creamy peanut butter
  • 3/4 cup powdered sugar
  • 2 tablespoons all-purpose flour
  • 1/4 teaspoon salt
  • 1/2 cup mini chocolate chips

Melt butter in a small sauce pan.  Now remember that I doubled the recipe, so if you’re only making one batch you’ll melt just one stick of butter.  I tried to take all the other pictures as if I was just making the one batch so you wouldn’t be confused, so just keep that in mind.

Scoop out 1/3 cup of tightly packed brown sugar.  You’ll be amazed at how much more sugar you can get in the measuring cup after you press it down a bit.

Add brown sugar to the melted butter.  Again, this shows my double batch.  You’ll only want to use one 1/3 cup of brown sugar to make a single batch.

Stir brown sugar and butter together until the brown sugar dissolves and bring it to a boil.  Let it boil for 1 – 2 minutes then remove from heat.

Add peanut butter to the hot brown sugar and butter mixture.

Stir in peanut butter until it’s completely blended.

Then stir in the vanilla and set aside to cool completely — about 15 – 20 minutes.

Get out your mini muffin tin and add paper liners.

Melt milk chocolate either in the microwave (in a microwave safe bowl) or using the double boiler method.  If you melt the chocolate in the microwave, make sure you only heat it in 30 second intervals, stirring in between each 30 second period.

Spoon about a teaspoon of chocolate into each paper liner and brush up the sides using a pastry brush.  This might be easiest if you take the liners out while you’re brushing the chocolate up the sides.

Once you have all the liners coated in chocolate, pop the entire tray into the freezer for about 15 – 20 minutes.

Your peanut butter mixture should be cool by now, so pour it into a mixing bowl and add the powdered sugar.

Add salt.

Add the flour and mix everything together.  You’ll want to start slow at first or you’ll end up with powdered sugar and flour all over yourself and your kitchen.

Add mini chocolate chips and gently stir or fold into the cookie dough.

The cookie dough will be a little too wet at this point, so stick it in the fridge for about 15 minutes so it has a chance to firm up.

Take your chilled, chocolate covered paper liners out of the freezer along with your chilled cookie dough.

Scoop cookie dough into the chocolate cups.  I used a small cookie dough scooper, but you can use a spoon or whatever you have on hand.  I found it best to not add too much cookie dough (just enough so it reaches the top of the cups) because you still have to cover them with chocolate.

Stick the filled cups back into the freezer for about 10 minutes, and in the mean time, melt some more milk chocolate.

Once the cups are chilled again, take them out of the freezer and spoon the melted chocolate over the top of each one so it’s as smooth as you can get it.  You might want to melt more chocolate than you think need because I ended up not having enough when I got to the last couple cups.  Unfortunately I forgot to take a picture of this step, so I apologize about that.  Pregnancy brain!

Chill cups one more time so that the chocolate firms up and then they’re ready to eat!

I think it’s best to store these in the fridge too keep them as firm as possible until you’re ready to eat them.  And don’t forget to have that glass of milk handy!  You’ll definitely need it!

I hope you enjoy!  I know I definitely did!

[yumprint-recipe id=’6′]

Chicken Parmesan

I’m always trying to think of new ways to incorporate chicken into our dinners.  This obviously isn’t a new recipe, but I hadn’t made it in several months (Steve is not the biggest Italian food fan like I am).  I originally found this recipe on the Food Network Website as one of Emeril’s delicious dishes.  It’s my favorite Chicken Parmesan recipe so far because of the melty cheese and the fact that you finish cooking the chicken in the oven, so it has a wonderful crispy outside, but is totally moist and juicy on the inside.

Here’s what you’ll need:

  • 1/4 cup flour
  • 1/4 cup Italian bread crumbs
  • 2 boneless, skinless chicken breasts
  • 1 egg
  • 2 Tbsp milk
  • spaghetti or linguini pasta (you can determine the amount you want)
  • shredded or sliced mozzarella cheese
  • about 1/4 cup grated Parmesan cheese, plus extra for sprinkling on top at the end
  • your favorite marinara sauce
  • extra virgin olive oil

Preheat your oven to 400° and position the rack to the middle position.  Bring a large pot of water to a boil for your pasta.

Trim excess fat off of chicken.  If you like your chicken a little thinner, you can either butterfly the breasts or pound them out a little flatter.  If you do, just make sure you adjust your cooking time since a thinner chicken breast will cook faster.

Here’s the seasoning I used first on the chicken breasts.  I got it at Sam’s Club, and I think you can find it at any major grocery store.  It’s just a mixture of several different spices.  You can also make the seasoning yourself — just Google Emeril’s Original Essence recipe and you should be able to find it pretty easily.

Lightly sprinkle Emeril’s seasoning on both sides of the chicken breasts.

Prepare your assembly line starting with the flour.

Add the egg and milk to a bowl and whisk together.

Your final step in the chicken coating assembly line will be the bread crumbs.

You can certainly just use bread crumbs, but I like adding some grated Parmesan cheese to mine.  I use about equal parts bread crumbs and cheese.

Mix the cheese and bread crumbs together so that it’s all evenly distributed.

Take your seasoned chicken breasts and coat both sides with flour.

Then dunk the flour covered chicken into the egg and milk mixture.

Then finally, thoroughly coat the chicken in the bread crumb and cheese mixture.  Try to make sure not to leave any wet spots.

Heat some extra virgin olive oil in a medium skillet over medium high heat and add the chicken breasts.

Cook about 4 minutes on the first side, then turn and cook 1 – 2 minutes on the other side.  If you butterflied or pounded out your chicken breasts so they would be thinner, you may want to only cook them for about two minutes on the first side and about one minute on the second side.  I let mine get a little dark, so you want them to be a little more golden and not so dark brown, but that’s what happens when you try to cook, clean, and take pictures at the same time.  Time can get away from you!

Spoon marinara sauce over chicken breasts.

Then add a generous helping of mozzarella.  You can add a sprinkle of Parmesan cheese too if you want.

Place entire skillet into the oven for about 4 minutes, or until the cheese is melted and chicken is cooked through.  Switch the oven to broil for about 1 – 2 minutes to start to brown the cheese.

While your chicken is cooking, add the pasta to the boiling water.  Spaghetti doesn’t take very long to cook and you want it to be al dente, or still have a little bite to it.

When you take the chicken out of the oven, the cheese should be nice and melted.

Drain your pasta, and add it back to the hot pot along with some olive oil to keep it from sticking.  Then add marinara sauce and stir to coat completely.

Add pasta and chicken to your plate and enjoy the crispy outside of the chicken breading combined with the juicy inside.  Just perfect!!


Strawberry Muffins

As promised, here is the strawberry muffin recipe I made yesterday for our Bible Study.  These were great too, but I think the blueberry muffins were more of a hit just because blueberry is a more traditional berry for a muffin.  But if you love strawberries like I do, I see no reason why you wouldn’t love these muffins as well!

Here’s what you’ll need:

  • 3 cups all-purpose flour
  • 2 cups white sugar
  • 1 tbsp baking powder
  • 2 tsp vanilla extract
  • 3 eggs
  • 1 stick (8 tbsp) unsalted butter, melted
  • 1 cup milk
  • 1 1/2 cup diced strawberries

Preheat oven to 400° and line a muffin tin with cupcake liners and set to the side.

In a large bowl, whisk together flour, sugar, and baking powder so that they are completely blended together.  Set aside.

In your mixing bowl, combine eggs and vanilla extract.  I found that it was easier to beat these ingredients together before adding the rest of the wet ingredients so the eggs get completely “scrambled”.

Next add the melted butter and milk, and mix until completely combined.

Then, with your mixer on the lowest speed, add in your flour mixture a little at a time.  Once the flour is almost completely wet, you can bump up the speed.  You just don’t wanna start to fast too soon or you’ll have flour all over your kitchen.

Look at these gorgeous strawberries!  Give them a good dice so that they’re about the size of a blueberry.

Add the diced strawberries to your batter.

You can either set your mixer to the “stir” speed, or you can fold them in by hand.

Fill your muffin tins about 2/3 full with the batter.  Then bake for 18-22 minutes.

When muffins are done baking, let them cool in the pan for about 5 minutes, and then remove the muffins and let them finish cooling on a wire rack.  Don’t these look beautiful?  You could also sprinkle some powdered sugar on top and I think that would be divine!  Enjoy!

Blueberry Muffins

Every Thursday night, Steve and I participate in a Couples’ Bible Study, and each week we are assigned a food dish to bring for dinner.  I love it, because I never have to try to brainstorm about what to make for dinner on Thursday nights.  Each couple brings a dish, and we get to eat a ton of scrumptious food!

Tonight was “Breakfast Night” so I volunteered to make home made muffins.  I love breakfast for dinner, don’t you?  I made two different types of muffins: Blueberry and Strawberry.  The Blueberry were definitely the favorite, which is why I’m posting the recipe for them first, but I will post the Strawberry Muffin recipe later!

Note: I made this recipe incorrectly, but they still turned out great, so I’m just going to post it the way I made it.

Here’s what you’ll need:

  • 4 oz cream cheese, softened
  • 1/4 cup & 1/3 cup white sugar
  • 1/2 tsp lemon zest
  • 1/2 tsp vanilla extract
  • 2 eggs
  • 3/4 cup milk
  • 1/2 cup vegetable oil
  • 3 tsp baking powder
  • 1/2 tsp salt
  • 1 pint blueberries

Preheat the oven to 350°, then start by combining cream cheese and 1/4 cup sugar in a large mixing bowl.

Add the lemon zest.  I zested the lemon straight over the bowl and just kind of eyeballed the amount.

The key to zesting a lemon (or any citrus fruit for that matter), is to only zest the very outer layer of the peel.  You want the colored part, not the white part which is very bitter.  So make sure when you’re zesting, you don’t go too deep.

Add the vanilla extract.

Then add one of the eggs and mix until thoroughly combined.  This is the part I messed up on.  The original recipe told me to set this aside and prepare the dry ingredients.  What I didn’t know was that I was to keep it to the side and not combine it with the dry ingredients, which were going to be combined with another set of wet ingredients.  Anyway, I mixed everything together and it turned out just great, so you can either do it the way I did it, or you can keep this wet mixture to the side, and I’ll tell you when to add it later.

Mix flour, 1/3 cup white sugar, baking powder, and salt in a medium bowl.  Make sure it is completely combined and blended together.

Here’s where I messed up.  I added the rest of the wet ingredients to the wet ingredients from before, when I should have mixed them separately, but you can do whatever you want.

I added the other egg, the milk….

And the vegetable oil.  And mixed it so it was completely combined.

Then I turned my mixer on low and gradually added the dry ingredients to the bowl.

Once the wet and dry ingredients were completely combined, I added the blueberries.  I gave them a rough chop first so that some were cut in half and others left whole.

If you notice the small chunks of cream cheese around the side of the bowl, that’s what happens when you don’t let your cream cheese come to room temperature before you try to mix it.  So make sure you don’t add cream cheese straight from your refrigerator!

Add cupcake liners to your baking pan and pour the batter into the cups, stopping when they’re about 3/4 full.

Now, if you decided to try the recipe the way it was initially designed here’s how you’d do this.  You would fill the cupcake liners half full with batter.  Then you would spoon 1 teaspoon of that first wet mixture that you set aside right on top of the batter that you poured into the liners.  Finally, you would go back and add more batter until the cups were 3/4 full.  I’m not sure why the recipe was written this way, but it must be for a purpose, so if you’d like to try it that way, be my guest!  Otherwise, you can just fill the cups 3/4 full with the batter where you “mistakenly” combined all the ingredients together.

Hope that wasn’t too confusing.

Bake the muffins at 350° for 30 minutes.  Then let them cool in the pan for a few minutes before transferring them to a wire rack to cool the rest of the way.

Go ahead and take a bite of one before it is completely cooled.  It’s worth it!  A muffin straight out of the oven….yum!

Hope you enjoy these blueberry muffins!  Everyone seemed to like them at the Bible Study!

Our Wedding Day: Part 3

Can you believe that I just now realized that I never finished posting about Steve’s and my wedding day!?  Tragic, I know!  So far all you’ve seen is up to the point where we were getting ready in our separate rooms.  How this escaped me, I don’t know.  I guess I can just chalk it up to pregnancy brain, which has been going strong for 6 months.

So back to our wedding day….Steve and I chose to see each other before the ceremony and take most of our pictures before hand.  That way our guests wouldn’t have to wait over an hour after the ceremony to eat dinner.  I’m so glad we decided to do it this way, and some of our best pictures are when we saw each other for the first time.

Here’s Steve waiting to see me, his bride, for the first time.

Isn’t he handsome!?

My sister-in-law, Stacey (who was also my photographer), led me to the spot where Steve would see me for the first time.

Once Steve knew I was behind him, he got super excited.  Ahh the suspense!!

Then Stacey gave him the OK to turn around and see me for the first time in my wedding dress.

Loved his reaction!!

Then he took time to admire my dress….

…and my hair (which only stayed curly like this for about half an hour…darn humidity!).

This is my “Yay!  He thinks I look beautiful!” face.

Then we took some Bride and Groom pictures.

Yay!!  Look at us!  We’re getting married!!!!

Next pictures are of our crazy bridal party.  Hopefully I’ll remember to post these next ones in a timely manner!

Baby Bentley

Now, before you get all excited….No, I did not have my baby!  This post is about another beautiful bundle of joy that came into the world on February 16th.  Meet Baby Bentley!!

At 7 lbs, 12 oz I don’t think he could be much cuter.  Look at that cute little button nose, and precious little lips!  Bentley’s parents were in a couples’ Bible study with Steve and me, and they have become dear friends.

This picture of Melanie and me was taken at her baby shower about 5 weeks ago.  Hard to believe in just about 10 weeks or so, my belly will be as big as her’s is in this picture!  I’m already starting to feel pretty uncomfortable, and I know it’s not going to be getting better any time soon.  But I’m just looking forward to the day I get to meet my son, and it makes everything completely worth it.

Steve came with me to visit Melanie, her husband Alex, and baby Bentley, and he got to practice holding a newborn.  It was so fun to see him with that tiny baby in his arms.  Afterward, he said he was really glad he came with me because it made him more excited for the day when our baby comes in about 3 months.  He’s going to be such a great daddy!

Ahh!!!  I can’t wait until I get to hold my baby in my arms!!  May 26th is just around the corner, and I’m hoping the time flies by.  In the mean time, I’ll just have to get my baby fix by holding Bentley.  Thank you so much, Melanie and Alex, for letting us be a part of the first couple days of your precious son’s life.  We love you guys!

3 Bean Slow Cooker Chili

When we went to our best friends’ Super Bowl party a couple weeks ago, I was in charge of making the chili.  I’ve tried a few different recipes before and none really hit the nail on the head for me, but this 3-bean chili recipe I found in one of my slow cooker cookbooks really turned out great!

Here’s what you’ll need:

  • 2 pounds lean ground beef
  • 3 tsp chili powder
  • 1 small yellow onion, chopped
  • 2 cans (16 oz) Dark Red Kidney Beans
  • 2 cans (16 oz) Pinto Beans
  • 2 cans (15 oz) Black Beans
  • 1 can (14 1/2 oz) diced tomatoes
  • 1 can (6 oz) tomato paste
  • 1 1/2 tsp salt
  • 1 tsp garlic salt
  • 1/2 tsp black pepper
  • 1/2 tsp ground cumin
  • 1/8 tsp ground cinnamon


Add ground beef to a hot skillet and cook until browned.


While your meat is browning, chop up your onion into a small dice.


Transfer browned meat to a paper towel lined plate using a slotted spoon.


Then pour the remaining fat from the pan into a mason jar, or another heat proof container where you can let it cool and harden.


Look at all that fat that’s in the jar that could have ended up in your arteries!  Whenever I have to drain fat or grease like this, I add it to a jar, and just keep that jar sealed in one of my cabinets.  Then when the jar gets full I throw it away.  Keeps my drain from getting clogged.


Transfer meat to your slow cooker.


Add the diced onion to the meat.


Add the black beans,


Pinto Beans,


And kidney beans to the slow cooker.


Then add the diced tomatoes and tomato paste.  I used a can of diced tomatoes with bits of jalapeno to give it a little extra kick.


Then add salts, pepper, cumin and cinnamon.


Then stir it around so that everything is blended and mixed together thoroughly.

Cover and cook on Low for 3 to 4 hours or on High for 2 hours.

Unfortunately I don’t have a picture of the final product because we finished cooking the chili at our friends’ house, but hopefully you get the idea.  Enjoy!

Chicken & Black Bean Taquitos

Steve and I are part of a Couples’ Bible Study with several of our friends, and we’re studying the book His Needs, Her Needs by Willard F. Harley, Jr.  In the first couple chapters of the book it talks about making deposits and withdrawals in each other’s “Love Bank.”  While the group was discussing some of the chapter, I leaned over to Steve and quietly asked what I could do to make a deposit in his Love Bank.  He immediately answered, “Make dinner.”

I’m ashamed to say that lately I have been very lacking in the dinner making department.  I don’t know if it’s because I’ve been tired because of the pregnancy, or maybe I just got used to not making dinner when I was super nauseous for several weeks and I could only eat a very select variety of foods.  Either way, we have eaten out or ordered in more than I care to say in the past few months, and my husband has felt neglected because of it (even if he won’t come right out and say it).

So when he told me that making dinner would add to his Love Bank, I decided then and there that I would try make dinner every night, unless unforeseen circumstances or plans prevent me from doing so.

I’ve been looking up and trying out new recipes that I’ve never made before, and I thought I might as well share them with you along the way!  This recipe for chicken & black bean taquitos is adapted from a recipe I found on foodgawker.com, and it’s actually pretty healthy!

Here’s what you’ll need:

  • 2 boneless, skinless chicken breasts, cooked and shredded (each breast can make 2-3 taquitos, so plan accordingly)
  • 1 Tbsp ground cumin
  • 1 tsp cayenne pepper
  • salt and pepper
  • 1/2 cup chicken stock (or broth)
  • 1/3 cup black beans, drained
  • 1/4 cup roasted red peppers, sliced or diced
  • flour tortillas
  • cheddar cheese (freshly grated tastes the best)
  • cilantro

Start by adding cooked and shredded chicken to a medium skillet over medium high heat (drizzle some olive oil on the pan before adding chicken).


Add cumin, cayenne pepper, salt and black pepper to the chicken.


Give it a good stir so that the spices coat each piece of chicken.


Pour chicken stock into the pan.


Bring to a boil and let simmer until all the liquid has evaporated (about 5 minutes).


While chicken stock is simmering, add black beans to the skillet and give it a stir.


Once all the liquid has evaporated add roasted red peppers to the chicken and beans and stir to combine.


Heat tortillas in the microwave fore about 30 seconds to soften them.  Place a tortilla on a cookie sheet (I put foil down over the cookie sheet for easy cleanup).  Then add some freshly grated cheese down the middle of the tortilla.


Add some of the chicken and black bean mixture to the tortilla.  Remember that you’re going to be rolling these, so don’t over fill it.


Next add some chopped cilantro.  You can omit this step if you’re not a cilantro fan.  I, for one, am a HUGE cilantro fan, so of course I added it.


Roll the tortilla and set it on the cookie sheet seam side down.  You don’t want the tortilla to unroll on you!


Once you have all your taquitos rolled, place in a 425° oven for about 15 minutes, or until tortillas are golden brown and crispy.  Turn taquitos over after 10 minutes to let the other side brown up.


Serve taquitos with freshly made salsa or guacamole.  They’re delicious, and the crispy tortilla adds great texture!  Hope you like them as much as we did!